How to Make a Slip Bobber Crappie Rig
Slip bobber rigs are super effective for crappie. Read on to learn how to make a slip bobber crappie rig. It’s easy, so go for it!
4 Things You’ll Need to a Make Slip Bobber Rig for Crappie:
1) a float (bobber)
2) a bobber stop, (and bead if your float’s hole is too big)
3) a hook, or jig to connect to the end of your line
4) a lead sinker (If you aren’t going to use a jig.)
1. Bobber or a Cork

Instead of the traditional yellow and orange spring bobbers, you’ll need a bobber with a tiny hole through the center of it for the float component of the rig. When crappie fishing, there are a few choices to consider.
Thill Crappie Cork
I recommend a 1/16 ounce or 1/8 ounce Thill Crappie Cork. The slip knot is already incorporated in the float and connected to the top of the float. The knot is ready to be slid straight onto your main line. With this sort of float, you don’t really need a bead since the hole in the Thill is quite small.
Balsa Wood Floats
Balsa floats are another great option. The buoyancy of balsa works great for crappie fishing. They are also incredibly long-lasting. Balsa floats can last for years, but foam floats are often wrecked even with modest usage.
Foam Floats
A foam float can work well enough for this setup. However bits of foam within the float can jam the line trying to feed through it. When that happens, you’ll have to clear out the obstruction with something long, and very thin. Not fun.
Foam Floats with Plastic Inserts
The foam floats with the tube going through the center are a good choice. The plastic tube keeps the line from catching on the foam as you feed the line though the bobber. But, they’re not as tough as balsa bobbers, so even though they are less expensive, they aren’t a good long-term investment.
2. Bobber Stop
Your “stopper”, or “stop” is what permits your float to glide up your main line before “stopping” at the length of line you’ve chosen in order to put your bait at the depth you think the fish are at.
String Type Bobber Stop

The string bobber stops that come on a plastic tube are inexpensive and simple to use. Simply pass the main line through the tube, pinch the string, then slide the tube off the main line. Finally tighten the string’s slip knot onto your main line.
Pros- Easy to use, casts well.
Cons- If used over a few trips, they can wear out, or after a few wettings, and dryings, they can tighten to the point where they can’t slide up and down the main line.
Rubber Football-shaped Type Bobber Stop

Pass the main line through the loop in the wire, pinch the rubber stopper, then put the plastic tab that is attached to the wire. This pulls your (now doubled) main line through a tiny hole in the rubber stopper. Keep pulling until the tag end of your main line pops out from the stop.
Pros- Easy to use.
Cons- When casting, the stopper can catch a bit on line spooled over or under it.
Four Hole Type Bobber Stop

Thread your main line in and out through each of the 4 holes.
Pros- Easy to use. Casts well. Stays put.
Cons- It can be tedious to thread the main line through the 4 very narrow holes.
3. Crappie Jig, or Hook

A slip bobber should float vertically in the water. You should match your float to your jig, not the other way around.
The size and weight of the jig should be determined by what the crappie are most likely to strike. Then, choose a float that floats vertically when tied on to the jig you’ve decided to use. Small split shot may be used to alter the weight beneath the float as desired, but you should avoid using split shot if at all possible. This is why I prefer floats that are sized for a given jig weight.
4. Sinker
Simply add some split shot to make the bobber sit vertically when using a hook and natural bait. However, for crappie, you want to utilize as small of a total weight as possible, so avoid any really big floats. Big floats need much too much weight to be effectively pulled to a vertical orientation.
How to Tie a Slip Bobber Rig:
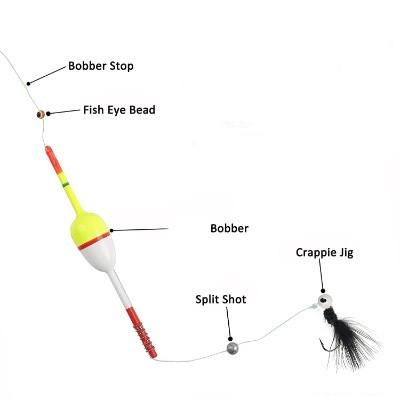
The steps for tying the slip bobber rig are shown below.
1. Attach a bobber stop at the end of your line.
To begin, attach the “bobber stop” to your main line and move it up a few feet to the depth you want your jig to rest at. You can change this length later by simply sliding the stop up, or down the main line.
1.1 Pull the bobber stop knot tight, if you’re using a string type stop.
If you used a string type stop, slide it off the plastic sleeve and tighten the knot. Cut the tag ends to around 1/8 inch.
2. Slide a little bead on to the end of your line.
You’ll need a bead for most floats. The tiny hole in the bead should cause it to stop at the bobber stop.
3. Slide the float onto the line.
Slide the float on and make sure it comes to a complete stop when it reaches the bobber stop.
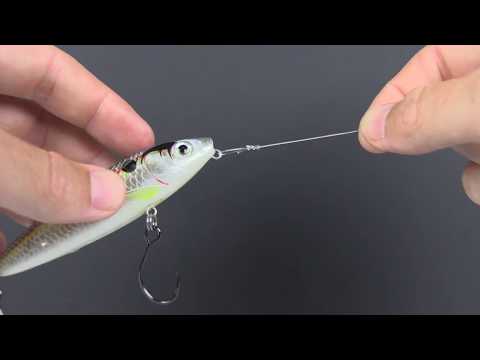
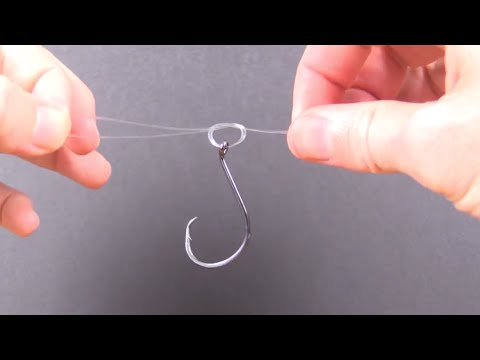
4. Attach a jig, or a hook.
Tie a loop knot on your jig. Tie a palomar knot, or clinch knot on your hook.

5. Make certain the float sits vertically.
To ensure the float to sits vertically in the water, make any last minute modifications necessary. The more vertical the float is, the simpler it is for a crappie to drag it under without feeling the bobber’s pressure.
Conclusion
The slip bobber is an effective crappie rig. It’s an incredibly adaptable, and simple set up. It’s tough to beat, particularly for novice crappie anglers.
See also Great Crappie Rigs .